

Dutch Oven Cooking With Charcoal Recipes
Cooking in a cast iron pot over a fire may seem like a lot of work. But I assure you it's easier than you think and just may become your favorite way to cook.Dutch Oven camping is a great way to impress your friends and family with a delicious and easy meal.
When traveling abroad the food is one of our favorite parts of travel. The colors, smells and tastes are what anchor in some of our fondest memories. So when we travel within the states we try our best to cement our memories of the day with a good meal.
If you're just looking for our favorite Dutch Oven Camping Recipes you can jump ahead HERE. But to master the Dutch Oven be sure to read on.
WHY YOU NEED A CAST IRON OVEN FOR CAMPING
Cooking at camp is oftenplagued by these thinpots and difficult to control camp stoves. Making for uneven heat and scorched meals.
Cast iron pots offer uniform heat and a set it and forget it type of cooking. My favorite part about Dutch Oven meals is once it goes on the fire, it's time to chill. They require almost no effort once the prep is done. Just sit back and relax.
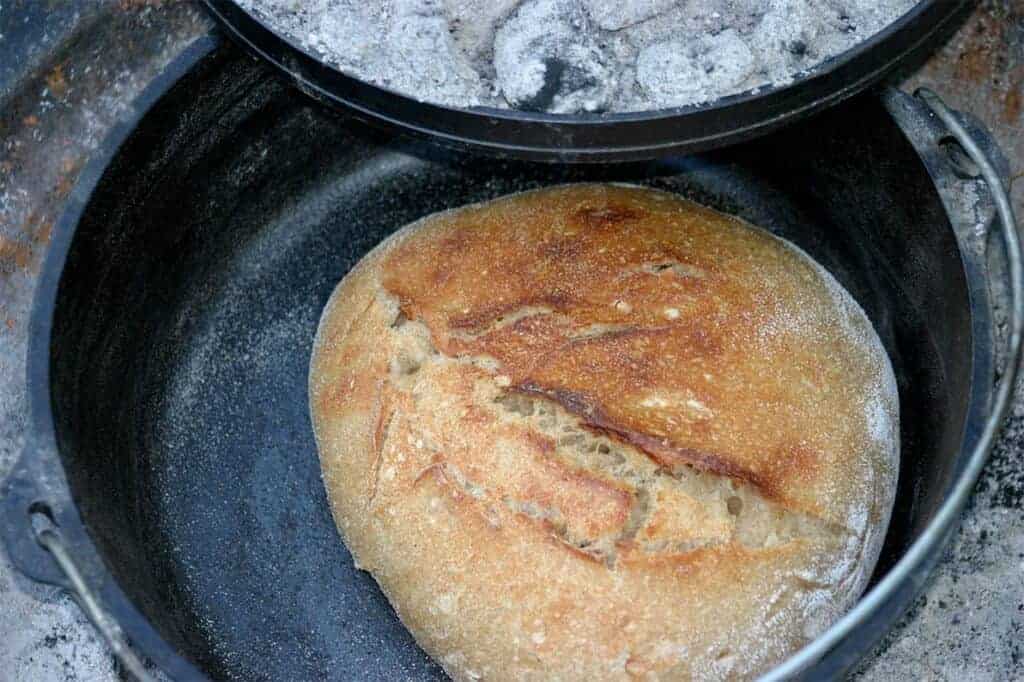
In addition, they open you up to a whole new level of camp cooking. I'd like to see youmake bread or biscuits on your camp stove. Baking is EASY in a dutch oven. In fact, just use your favorite recipe or a variety of ready to bake options and you'll have the entire camp drooling over your biscuits and bread.
DUTCH OVEN MEALS
- Sourdough bread – home-made of course and absolutely delicious
- Pizza– home-made crust with toppings of your choice. If you think you can't make from scratch bread and pizza dough while on the road, you're wrong. I will show you how.
- Soups, stews, fried fresh fish and some amazing desserts
Head over to Country Living for some mouth watering recipes.
CHOOSING THE RIGHT OVEN
- Aluminum is lighter, can be washed with soap, but heats faster and can have hot spots. Makes cooking things like bread or pizza dough more difficult as the heat isn't distributed evenly.
- Cast iron requires initial seasoning, can't use soap, heavy, but has better cooking properties with more consistent heat.
- Cast iron is the only way to go in my opinion. I will go over everything you need to keep these seasoned and non-stick
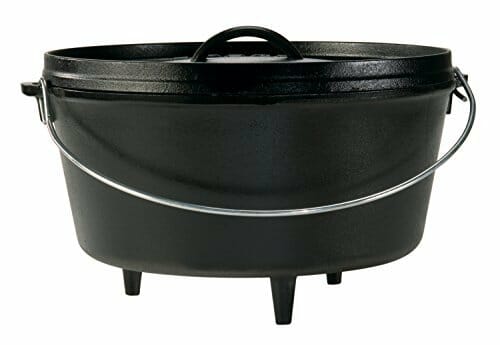
WHICH ONE TO GET FOR DUTCH OVEN CAMPING
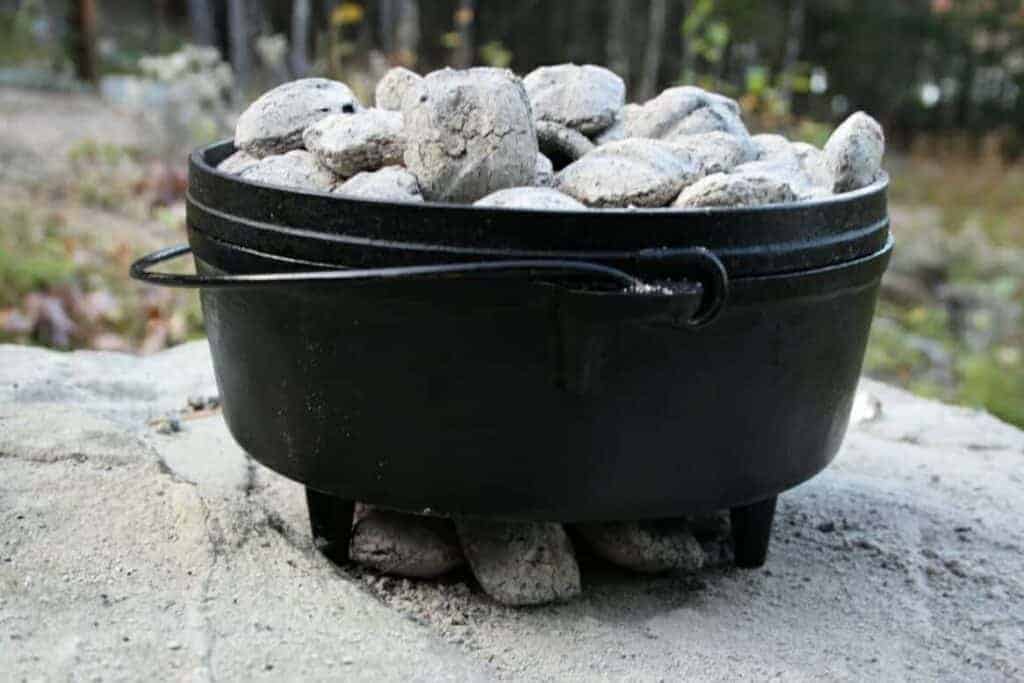
- Lid choice and feet –this is important –to cook with a Dutch Oven over coals it's essential to be able to apply heat from not only the bottom but also the lid. This allows it to function like an oven. The feet are necessary so you can place coals under the oven and the lid must have a lip so that coals will stay put on top.
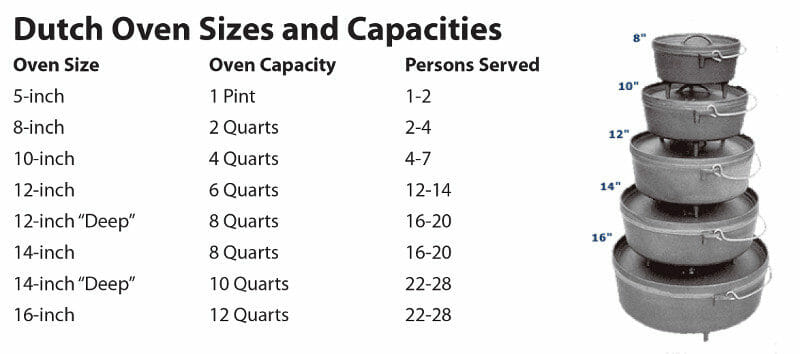
- What size – we use a 12 inch but your needs may vary based on how many people you plan to serve. The 12 inch would be the smallest I would go if you want to make bread.
- What brand you ask – I prefer Lodge as they are affordable and very well made. Lodge has been in the business since 1896 so I think they know a thing or two about Dutch Ovens. Stay away from the less expensive options that are too thin and don't cook evenly.
- Don't forget the Lid Lifter it's a must-have accessory. Trust me it's a pain without one.
What Size Dutch Oven Do I Need
DUTCH OVEN SEASONING
So now that you have your new oven we need to get it all seasoned up. Seasoning is that magic part that bakes in the oils so that it will beeasy to clean and last a lifetime. Here are the steps
- First you will need to wash the pot and lid with soap and warm water. Be sure to wash everything including the outside. This gets rid of all the wax and oils that are on it from the factory. This is the only time you will use soap on your Dutch Oven. Thoroughly dry before going to the next step.
- Apply vegetable oil over the entire pot and lid
- Place upside down on a cookie sheet and bake at 350 for 30 minutes. I recommend doing this twice with a new oven. Once complete, turn off oven and let it cool.
DUTCH OVEN CHARCOAL COOKING
Now that your new oven is ready let's cover one of the most important parts of Dutch Oven cooking, temperature control.
Without a doubt, the most precise way to heat your oven is with good quality charcoal briquettes. For baking or dishes that require consistent heat, briquettes are the way to go. For less demanding dishes like a stew I often just use coals from the fire and rotate the pot frequently.
The collapsible charcoal chimney below makes for quick and easy briquette startup without the need for harmful and dangerous lighter fluid.

TEMPERATURE GUIDE
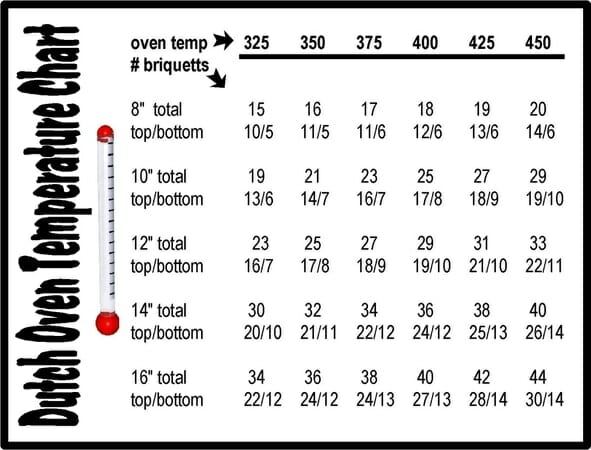
Thistemperature guide will get you real close to that perfect temp for your particular recipe.
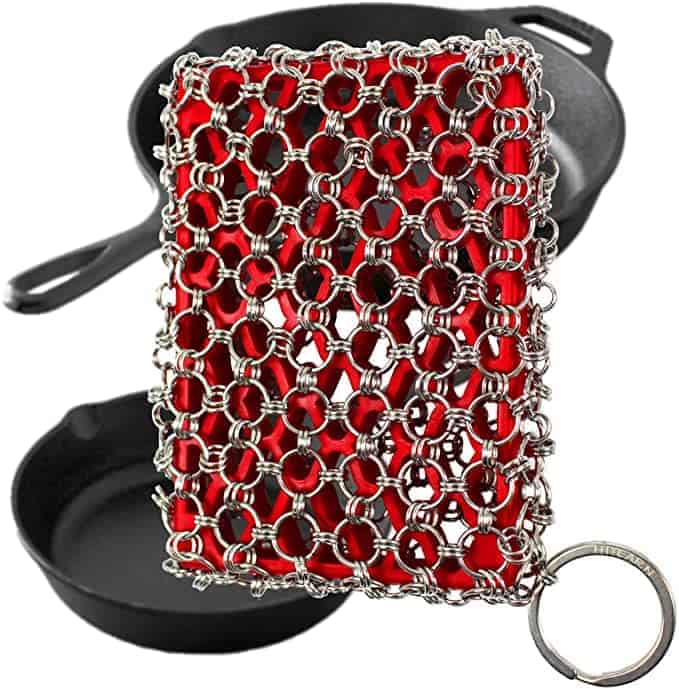
HOW TO CLEAN YOUR CAST IRON POT
And last but certainly not least, it's time to do the dishes. Important stuffhere so don't skip it.
- First off don't use soap. It will get rid of all that seasoning and patina that make these such good cookers. If you do happen to wash with soap just be sure to re-apply oil and bake according to the seasoning instructions above.
- For cleaning, I just scrape out all the food and wash with warm water. If something is sticking you can put some water in the pot and simmer over a fire to loosen things up.
- If you're finding that you're not able to clean your dutch oven effectively we like to use a scrubber likethis
- Once cleaned and dried it is a good idea to wipe it down with a light coat of oil before storing.
Dutch Oven Campfire Cooking
If you follow these simple tips you will have a great performing Dutch Oven that will truly last for generations.
I find that cooking with cast iron is MUCH easier than any other method. Save the stoves for boiling water for that morning cup of coffee.
The baking ability of these ovens opens up a whole new category of food. Making bread, biscuits or cookies will be sure to put a smile on everyone's face.
Our Top Pick – Lodge Camp Dutch Oven
DUTCH OVEN CAMPING RECIPES
Now that you have your new Dutch Oven lets explore some of our favoriteDutch Oven Camping Recipes.
DUTCH OVEN SPICY ANCHO TURKEY CHILI
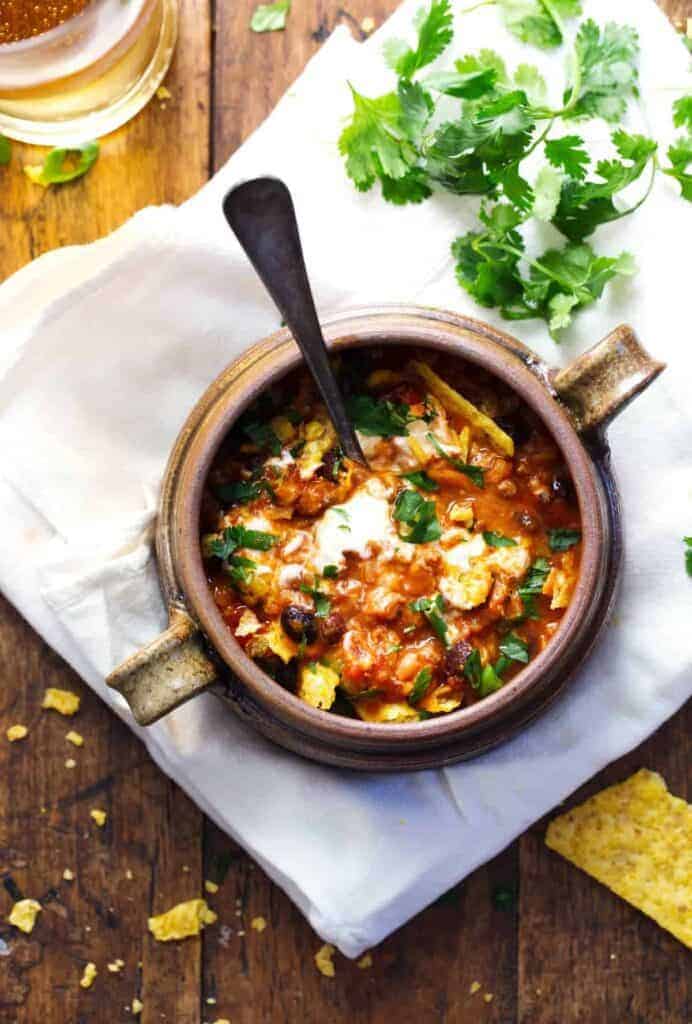
This hearty feel-good tex-mex chili is a favorite of ours. We love this recipe because it's very forgiving. If you don't have every single ingredient on hand there's no need to worry. The recipe loves substitutions and is a great way to use up what you already have in the cooler. Head over to Pinch of Yum for more details on this great Dutch Oven recipe.
Ingredients
- 1 cup farro (another grain like brown rice or quinoa would work)
- 2 cups chicken broth
- 3 cups water, divided
- 1 tablespoon olive oil
- 1/2 red onion, minced
- 2–3 cloves garlic, minced
- 2–3 jalapeños, minced (remove ribs and seeds if you don't want it to be spicy)
- 1 lb. ground turkey
- 1 14-ounce can black beans, rinsed and drained
- 2 teaspoons ancho chili powder
- 2 teaspoons chili powder
- 1 teaspoon cumin
- 1 teaspoon salt
- 1 cup salsa (works best with a "fresh" salsa brand like Salsa Lisa)
- 2 14-ounce cans crushed fire roasted tomatoes
- toppings (sour cream, cheese, green onions, tortilla chips)
Instructions
- Heat the olive oil over medium high heat. Add the onions, garlic, and jalapeños and saute for 1-2 minutes, stirring frequently to avoid burning the garlic. Add the turkey and cook until all the meat is browned and broken apart into "crumbles". Add the black beans, ancho chili powder, chili powder, cumin, salt, and salsa and simmer for a few minutes.
- Add chicken broth and 1 cup of water along with the farro (or rice or whatever grain you're using). Simmer for 30 minutes.
- Add the tomatoes and however much of the remaining 2 cups water that you feel like you need to get the right consistency.
- Top with sour cream, cheese, green onions, and tortilla chips.
If you like a sweeter chili, add a tablespoon or two of tomato paste to the meat mixture before adding the salsa, tomatoes, and water.
We've also substituted a dark beer for part of the water which turned out terrific.
DUTCH OVEN CHICKEN MARBELLA
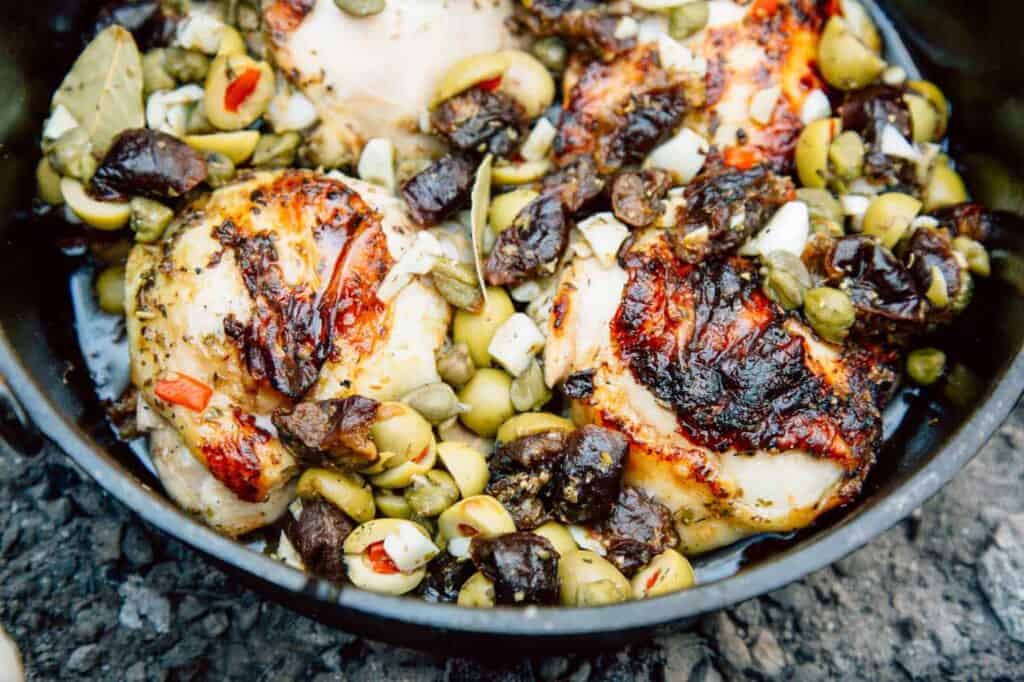
The folks over at Fresh Of The Grid have thrown together a great recipe for Dutch Oven Camping. The original recipe is from the 1983 Silver Palate Cookbook which they have tweaked to make it Dutch Oven Camping friendly.
The Mediterranean themed dish uses olives and prunes to produce a savory chicken dish with just the right amount of sweetness. The trick to using this recipe for camping is doing some of the prep at home.
The recipe is from Fresh Off The Grid and I would recommend heading there for more detailed instructions on how to make this delicious dish.
Ingredients
- 1 cup chopped prunes
- 1 cup olives, pitted & halved
- 1/2 cup dry white wine
- 1/4 cup capers
- 1/4 cup red wine vinegar
- 6 cloves garlic, roughly chopped
- 2 tablespoons dried oregano
- 2 bay leaves
- 1 teaspoon salt
- 4 chicken thighs, skin on
- 1 tablespoon olive oil
- 4 teaspoons brown sugar
Instructions
- MARINATE THE CHICKEN: Place all ingredients except for the oil and brown sugar in a freezer bag to marinate. Place in your ice chest for at least 6 hours and up to 48 hours.
- PREP YOUR CAMPFIRE: Prepare 27 coals. You can use wood embers if you must, but you'll have to guestimate the proper heat ratio (you're aiming for 425F). Once all the coals are ready, knock them into a flat pile and place dutch oven on top of all of them. This will produce the high heat required for browning.
- BROWN THE CHICKEN: Heat 1 tablespoon of oil in the Dutch oven. The oil is hot and ready when a drop of water instantly sizzles when it hits the pan. Remove the chicken from the marinade, and dust 1 teaspoon brown sugar over the skin side of each thigh. Brown the thighs skin side down over high heat until the skin is crispy and deep golden brown, about 6-8 minutes. Flip to brown the other side, 2 minutes.
- BAKE: Remove Dutch oven from heat. Add the marinade (liquid, prunes, olive, capers and all!) to the dutch oven and cover. Evenly distribute 18 coals on the lid and set the Dutch oven on a bed of 9 coals. Bake for 30 minutes, until the thighs are cooked through and their juices run clear when pierced with a knife.
- SERVE & ENJOY: Serve over couscous, rice, or pilaf with some of the sauce spooned over the top.
DUTCH OVEN CAMPING CHILAQUILES
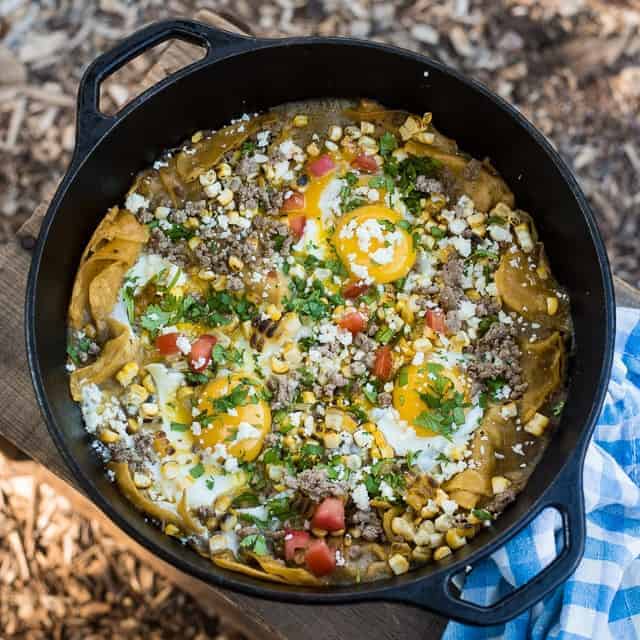
You're probably asking just what are Chilaquiles. Well, this traditional Mexican dish is made up of crisp corn tortillas, spices, pulled pork, and red or green salsa. All simmered and cooked down till you have an enchilada like dish.
But this recipe we're going to share with you puts a twist on this iconic dish that is guaranteed to impress. It's so good in fact, you can have it for breakfast. This recipe adds lightly poached eggs to the dish for a quick and tasty breakfast that will leave everyone wanting more. The recipe is from The Adventure Bite so be sure to check them out for more great Dutch Oven Recipes.
Ingredients
- 1 16 oz can of enchilada sauce
- 1 tsp Olive oil
- 20 corn tortillas cut into eighths
- 1 cup roasted corn or whatever filling you have on hand
- ½ cup crumbled cotija cheese
- 5-6 eggs
- ½ cup cilantro
- Juice of 1 lime
- Salt and freshly ground black pepper
Toppings:
- Chopped fresh cilantro leaves for garnish
- Lime slices for garnish
- Quick pickled red onions slice onions and let rest in rice wine vinegar for 15 mins
- Hot sauce
- Mexican crema sauce
Instructions
- Greased Dutch Oven.
- Open enchilada sauce.
- Cover bottom of Dutch Oven with olive oil. Layer corn tortillas in with the sauce, cheese and any toppings desired. (It is best to cover all tortillas so they don't dry out). Top with cracked eggs if desired.
- Place in a campfire for 30 minutes. Until top is browned and cooked through and egg whites are set with runny yolks.
- Top with cilantro, lime slices, and pickled red onions. Serve with hot sauce and crema if desired. Enjoy!
CHICKEN, SHRIMP, AND SAUSAGE DUTCH OVEN JAMBALAYA
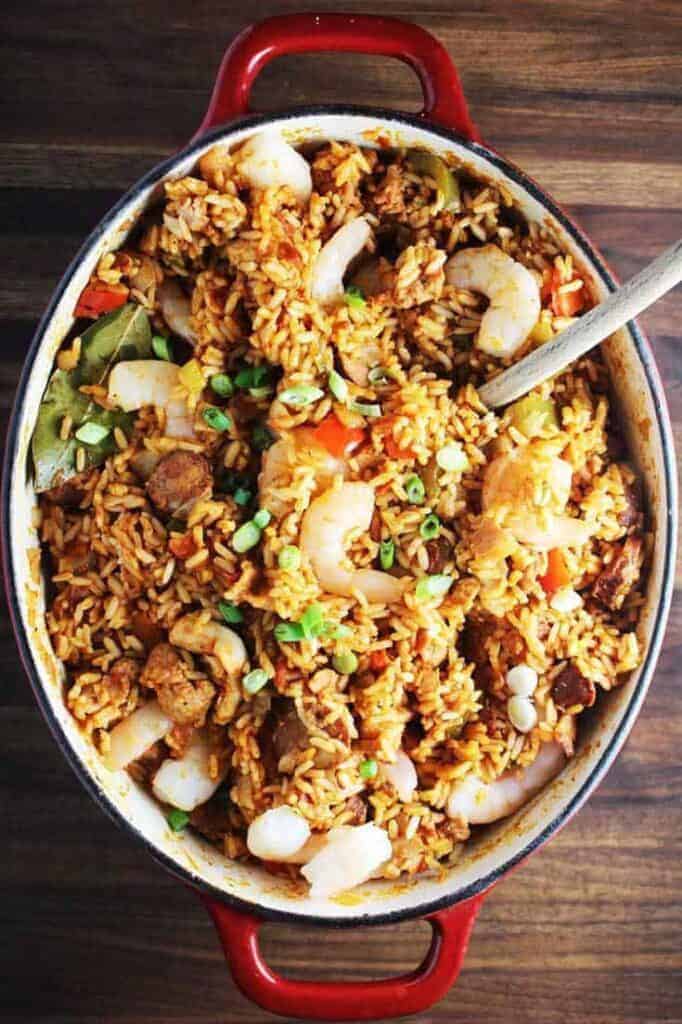
This is one of our favorites and if you ever bump into us camping I can assure you we'll either be making it or eating off the leftovers. Hands-down the most flexible dish that goes well with anything and is great the next day.
We like to mix it with our eggs the next morning or throw it in a tortilla for a great lunch wrap. The key to this recipe is being flexible and don't get too hung up on the specifics. Use what you already have or what tickles your fancy at the grocery store.
The only trick is to keep an eye on it to make sure it doesn't dry out. If it gets a bit dry just add some water, wine, beer, or whatever.
Here's a great recipe to get you started. It's from Our Happy Mess and like I said earlier, just use it as a general guide. The beauty of this dish is how flexible you can be
INGREDIENTS
- 1/2 lb bacon diced
- 1 lb andouille sausage diced, or dried chorizo sausage
- 1 lb fresh pork sausage casings removed
- 4 boneless, chicken thighs cut into 1-inch pieces
- salt
- freshly ground black pepper
- 2 yellow onions diced
- 2 bell peppers seeded and diced
- 4 celery stalks diced
- 5 cloves garlic minced
- 3 cups converted long grain white rice
- 1 teaspoon dried thyme
- 2 dried bay leaves
- 1 tablespoon smoked paprika
- 1 teaspoon cayenne pepper
- 2 teaspoons celery salt
- 1 28 oz can crushed tomatoes
- 2 cups chicken stock
- 1 lbs shrimp peeled and deveined
- 1 bunch green onions chopped
INSTRUCTIONS
- In your dutch oven, over medium heat, render the bacon with the fresh and andouille sausages until browned.
- Season the chicken with salt and pepper and add to the pot. Cook, stirring occasionally, until the chicken is browned. Remove all the meat to a bowl.
- Add the onions and cook for about 15 minutes, until beginning to caramelize. Add the bell peppers, celery and garlic to the pot and continue cooking, stirring frequently, until vegetables are softened, about 5 minutes. Add the meat back to the pot.
- Stir in the rice, thyme, bay leaves, paprika, cayenne, celery salt, one tablespoon of salt and 1 teaspoon of freshly ground pepper. Cook for about 2 to 3 minutes until spices are evenly distributed.
- Turn the heat up to medium high and add the crushed tomatoes and chicken broth. Stir and bring to a boil. Reduce the heat to low, cover the pot, and simmer for 15 minutes.
- Season the shrimp with salt and pepper and stir into the rice, along with the green onions. Put the lid back on the pot, turn off the heat, and leave to sit for another 10 minutes. The heat inside the pot will cook the shrimp.
- Remove the lid, fluff with a fork, and serve
HOW TO MAKE DUTCH OVEN PIZZA
Who doesn't like a good pizza! And how cool would it be to make an amazing pizza in your Dutch Oven? It's delicious, easy, fun, and perfect for both big and small groups.
INGREDIENTS
- 8-10 oz pizza dough, (8 oz for 10″, 10 oz for 12″)
- 1 tablespoons each flour + cornmeal
- Toppings of choice
INSTRUCTIONS
- PREPARE YOUR COALS: Start by preparing your coals or charcoal briquettes. You'll need about 30 for a 10" Dutch oven, or 33 for a 12" Dutch oven. Once the coals/briquettes are ready, preheat your Dutch oven to 450. For a 10" oven, place 10 coals under the oven and 20 on the lid. For a 12" oven, place 11 coals under the oven and 22 on the lid.
- PREPARE THE DOUGH:In the meantime, roll out your dough. Dust a cutting board with flour and using a water bottle or bottle of wine (who brings a rolling pin camping?), roll the dough into a circle. Dust the cornmeal onto a piece of parchment and transfer the dough to the parchment paper. Dock the dough all over with a fork (this will prevent the dough from bubbling up while baking).
- TOP: Add whatever toppings you wish. See our suggestions here.
- BAKE THE PIZZA: Carefully remove the Dutch oven from the coals and remove the lid. Place the pizza, parchment paper and all, into the Dutch oven, lay the spacers across the top, cover, and return to the bed of coals. Bake for 15-20 minutes, until the crust is golden.
- SERVE & ENJOY!
FOR 40 MORE AWESOME DUTCH OVEN RECIPES HEAD HERE
DUTCH OVEN CAMPING AT IT'S FINEST
We hope we talked you into the Dutch Oven Camping craze. It's easy, fun, and delicious. We'd love to hear what your favorite recipes are so share the love….happy eating!
If you enjoyed this don't forget to share, to your left, on your favorite social media outlet.
Thanks and happy travels!
Dutch Oven Cooking With Charcoal Recipes
Source: https://www.outsidenomad.com/dutch-oven-camping/
Posted by: rodriguenother44.blogspot.com
0 Response to "Dutch Oven Cooking With Charcoal Recipes"
Post a Comment